6 CSS Codes Every Therapist Should Add to Their Squarespace Website
Have you ever wanted to add extras to your Squarespace template but were afraid of CSS? Completely valid response.
But CSS isn’t that scary. And you don’t have to write it, someone else already did. You just need to know where to put it and what, if anything, to swap out to match your brand.
Every code in this post comes from real, tested sources, like me. I’ll tell you exactly what it does, how to customize it for your practice, and where in Squarespace to add it. Come with an open mind and a willingness to open one settings panel and paste something in it.
Let’s goooooo!
Two Places CSS Lives in Squarespace
Before we get into the actual codes, you need to know about two different places where CSS can live in Squarespace because not all of these codes go in the same spot.
The Custom CSS Panel is for site-wide styles. Anything you put in there applies across your entire website.
To find it: Website → Pages → Custom Code → Custom CSS
A Code Block is a block you add directly to a specific page, just like you’d add an image or a text block. It only affects that page or section, not your whole site.
To add one: go into edit mode on any page → click the + add elements to add a block → search for Code → paste your code inside it.
Five of these six codes in this post go in the Custom CSS panel. One goes in a Code Block, and I’ll tell you which one when we get there.
One more thing: CSS only changes how your site looks, not how it works. If you paste something in and don’t like it, delete it and your site goes right back to normal. Nothing breaks permanently. You have full permission to experiment.
Smooth Scroll
What it does: When someone clicks a link that jumps to a section of your page, like a “learn more” button that scrolls down to your services, Squarespace’s default is a jarring instant jump. This one line replaces that with a smooth, fluid scroll. It’s a tiny detail that makes your site feel noticeably more polished.
html {
scroll-behavior: smooth;
}
How to customize it: Nothing to change here. It’s one line and it just works.
How to add it:
Go to Website → Pages → Custom Code → Custom CSS
Paste the code in and save.
Dropdown Menu Drop Shadow
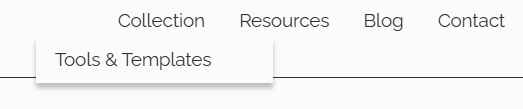
What it does: If you have a dropdown folder in your navigation like a "Services" link that expands to show individual service pages then you've probably noticed the dropdown blends right into your header background. This code adds a subtle drop shadow underneath it so it visually separates from the header, and left-aligns the links so they're easier to read.
.header-nav-folder-content {
box-shadow: 0px 5px 5px rgba(0,0,0,0.25);
text-align: left!important;
margin-right: -50px !important;
}
How to customize it:
Changergba(0,0,0,0.25)to adjust the shadow — the last number (0.25) controls opacity. 0.1 is very subtle, 0.4 is more dramatic
Remove the margin-right line entirely if you want the dropdown to stay right where it is
Adjust -50px to shift the dropdown left or right if needed
How to add it:
Go to Website → Pages → Custom Code → Custom CSS
Paste the code in and save
Open your site and hover over any navigation folder to see the change
Contact Form Button Hover Effect
What it does: Your contact form's submit button just sits there by default of no reaction, no feedback when someone hovers over it. This code changes the button's background and text color when someone hovers their cursor over it, which makes your form feel more interactive and intentional.
.form-wrapper .sqs-button-element--primary:hover {
background-color: #9aa9a2 !important;
color: #fafaf8 !important;
}

How to customize it:
Change#9aa9a2to any hex code to set the hover background color
Change#fafaf8 to any hex code to set the hover text color
Make sure the two colors have enough contrast so the text is readable on hover
How to add it:
Go to Website → Pages → Custom Code → Custom CSS
Paste the code in and save
Go to your contact page and hover over the submit button to see it in action
Hover Highlight on Body Text Links
What it does: Links inside your body text, in blog posts, on your about page, in your services descriptions, are usually just a color change. This code adds a colored underline border to every body text link, and fills in a highlight color behind it when someone hovers. It's a small detail that makes linked text feel deliberate and designed rather than like an afterthought.
p a {
border-bottom: solid 2px #9aa9a2 !important;
}
p a:hover {
border-bottom: solid 2px #9aa9a2!important;
background: #9aa9a2 !important;
}

How to customize it:
Change#9aa9a2 in both sections to any hex code to match your brand color
Change2px to make the underline thicker or thinner
The hover background and the underline color don't have to match — you can use two different colors for a more layered effect
How to add it:
Go to Website → Pages → Custom Code → Custom CSS
Paste the code in and save
Find any body text link on your site and hover over it
Custom Cookie Banner Styling
What it does: Squarespace's default cookie consent banner uses a generic system font that almost certainly doesn't match the rest of your site. This code updates the banner's font family, text color, background color, and adds a border so it looks like it actually belongs on your website instead of being dropped in from somewhere else.
.gdpr-cookie-banner * {
font-family: "Raleway"!important;
color: #333230!important;
}
.gdpr-cookie-banner {
background: #fafaf8 !important;
border: 1px solid #333230;
}

My exact code on my website:
.gdpr-cookie-banner * {
font-family: "Raleway" !important;
color: #333230 !important;
}
.gdpr-cookie-banner {
background: #fafaf8 !important;
border: 1px solid #333230;
}
.gdpr-cookie-banner button,
.gdpr-cookie-banner a.gdpr-cookie-banner-accept {
background-color: #9aa9a2 !important;
color: #fafaf8 !important;
border-color: #9aa9a2 !important;
}
How to customize it:
Change "Raleway" to whatever font you use on your site as it needs to match the exact font name as it appears in Squarespace
Change#333230 to your brand's dark color for text and border
Change#fafaf8 to your background color, using your site background keeps it subtle; using a contrasting color makes it more visible
Make sure the font you choose is easy to read — this is a legal notice, legibility matters
How to add it:
Go to Website → Pages → Custom Code → Custom CSS
Paste the code in and save
Your cookie banner will appear to new visitors and you can preview it by clearing your browser cookies or viewing your site in an incognito window
Custom Checkmark List
What it does: This one is different from the others as it's an HTML and CSS code block you add directly to a page, not a site-wide style. It replaces a plain bulleted list with a styled list where each item has a teal circle with a checkmark icon next to it. It's perfect for a services page, an "about my approach" section, or anywhere you're listing what you offer or what makes your practice different.
This is also the one place in the post where the code is longer but don't let that scare you. You're not writing it. You're editing it. The only things you need to change are the list items themselves.
Here's the full code:

<style>
.tfs-features {
list-style: none;
padding: 0;
margin: 0;
}
.tfs-features li {
display: flex;
align-items: flex-start;
gap: 14px;
margin-bottom: 18px;
font-size: 16px;
line-height: 1.6;
color: #333230;
}
.tfs-check {
flex-shrink: 0;
width: 26px;
height: 26px;
background-color: #9aa9a2;
border-radius: 50%;
display: flex;
align-items: center;
justify-content: center;
margin-top: 2px;
}
.tfs-check svg {
width: 14px;
height: 14px;
}
</style>
<ul class="tfs-features">
<li>
<span class="tfs-check">
<svg viewBox="0 0 12 10" fill="none" xmlns="http://www.w3.org/2000/svg">
<path d="M1 5L4.5 8.5L11 1.5" stroke="#333230" stroke-width="2" stroke-linecap="round" stroke-linejoin="round"/>
</svg>
</span>
<span><strong>Your first item</strong> — description goes here</span>
</li>
<li>
<span class="tfs-check">
<svg viewBox="0 0 12 10" fill="none" xmlns="http://www.w3.org/2000/svg">
<path d="M1 5L4.5 8.5L11 1.5" stroke="#333230" stroke-width="2" stroke-linecap="round" stroke-linejoin="round"/>
</svg>
</span>
<span><strong>Your second item</strong> — description goes here</span>
</li>
<li>
<span class="tfs-check">
<svg viewBox="0 0 12 10" fill="none" xmlns="http://www.w3.org/2000/svg">
<path d="M1 5L4.5 8.5L11 1.5" stroke="#333230" stroke-width="2" stroke-linecap="round" stroke-linejoin="round"/>
</svg>
</span>
<span><strong>Your third item</strong> — description goes here</span>
</li>
</ul>
How to customize it:
Replace "Your first item" and the description text with your actual list content, add or remove <li>...</li> blocks to add or remove items, just make sure each one includes the full <span class="tfs-check"> block with the SVG inside it
Change background-color: #9aa9a2 in the .tfs-check section to change the circle color
Change color: #333230 in the .tfs-features li section to change the text color
Change stroke="#333230" inside each SVG path to change the checkmark color
How to add it:
Go into edit mode on the page where you want the list
Click + to add a new block → search for Code → select it
Paste the entire code into the code block
Click apply and you'll see the styled list appear right on the page
To add more items, copy one full <li>...</li> block (everything from <li> to </li> including the SVG) and paste it before the closing </ul> tag. Update the text and you're done.
A Few Things to Keep in Mind
Stack your Custom CSS codes. Codes 1 through 5 all go in the same Custom CSS panel and just paste them one after another with a blank line between each one. You don't need a separate panel for each.
Test on mobile. After adding any code, check your site on your phone. Most of these look great on mobile too, but it's always worth a look before you consider it done.
If something looks off, delete it. Select the snippet you added, delete it, save. Your site returns to exactly how it was. CSS is completely reversible.
The Code Block is page-specific. Unlike the Custom CSS codes, your checkmark list only appears on the page where you add the Code Block. If you want it on multiple pages, add a Code Block to each one.